| Home |
|
WinHelp |
|
HTML Help |
|
MS Help 2.0 |
|
LongHorn Help |
|
Store |
|
Links |
|
Betas |
|
Projects |
CHM-To-HxS Converter
Updated March 30, 2001
Download the CHM-to-HxS Converter
Download the MS Help 2.0 Custom Viewer...
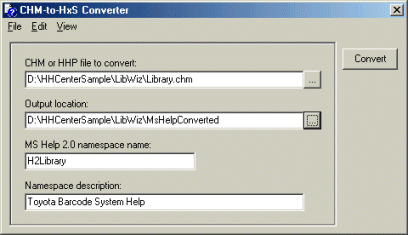
The CHM-to-HxS conversion instructions I posted on the MSHelp2 list are just a tad detailed, and it suddenly seemed I could make them a tad easier. In view of this, I've created a small executable that will help simplify this process. The CHM-to-HxS converter will allow you to easily convert a CHM or an HHP file to an MSHelp 2.0 HxS file:
First, browse to the CHM or HHP file you want to convert, then browse
to a target folder for the output files, give the H2 namespace a unique
name and description, and hit the Convert button. The three processes of conversion/compilation/registration will be viewable in their separate
windows as they occur.An additional dialog (available from the Edit menu) allows you to add additional command-line switches to the overall conversion process. Note that the -p switch on the HxConv utility appears to be broken at the moment.
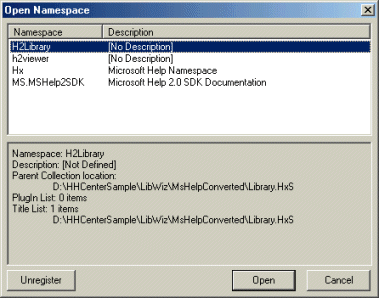
Rob Chandler has kindly added another dialog to the converter. The converter has a File menu, and the first item is Open Namespace. Clicking on this menu item will open Rob's dialog, which lists all the MS Help 2.0 namespaces that are registered on the system:
Highlighting any namespace will list some of that namespace's attributes. Double-clicking on the namespace, or clicking the OK button, will open that namespace into DExplore (the viewer that ships with the MS Help 2.0 preview). So ...
Once you convert a CHM to an HxS file, you can open it immediately from the converter as long as the process works correctly.I've added an Unregister button to Rob's Open Namespace dialog. This should make it easier to maintain namespaces on the system by allowing you to add or remove them more easily.
Notes:
Paul Neshamkin notes that Related Topics Object tags are not converted. They are just left in the HxS, and, of course, will work fine as long as the CHM can be found. Also, John Daigle has found that having a binary index in a CHM = no convert. The same project with no binary index = perfect. Finally, he tried the same test with minary vs. non-binary TOC and having a Binary TOC seems to work fine.
Theory
There are some command-line utilities that are included on the Preview CD that will help you through the conversion process. The four steps are:
1) Convert the CHM or HHP file to a Help 2.0 collection (HxC) with associated files.
2) Compile the Help 2.0 collection into a stand-alone file (HxS).
3) Register the namespace's description.
3) Register the HxS file as the namespace.
None of these command-line utilities are included in the system's Path variable, so unless you include them yourself, you'll have to provide the full path to each utility when you call it.
To convert the CHM or HHP file to an HxC file and its associated files, run hxconv with the first argument pointing to the CHM file. Also include the -o switch to let the converter know where to send the output files to:"c:\program files\microsoft visual studio.net\common7\ide\hxconv" d:\hhcentersample\libwiz\library.chm -o d:\hhcentersample\libwiz\MsHelpConverted
To compile the HxC file and its associated files from this first step into a stand-alone HxS file, use the -p switch to point the hxcomp compiler utility to the HxC file. You also need to use the -r switch to point it to the full root directory where the HxC file is located, and also use the -l switch to tell it where to write the log file to (-l is a lower-case -L):
"c:\program files\microsoft visual studio.net\common7\ide\hxcomp" -p d:\hhcentersample\libwiz\MsHelpConverted\library.HxC -r d:\hhcentersample\libwiz\MsHelpConverted -l d:\hhcentersample\libwiz\MsHelpConverted\log.txt
Once the HxS file is created, you need to register the description for the namespace. This is done with hxreg, which will also be used to register the HxS file itself. The -n switch references the namespace name (which we'll register in the next step), and the -c switch specifies the HxS file. The -d switch provides the description itself. Rob Chandler found this needs to be in quotes. If the description is not in quotes, only the last word of the description would be registered as the description. In the following example, if no quotes were used, the description would be registered as "Help".
"c:\program files\microsoft visual studio.net\common7\ide\hxreg" -n CompileTest -c d:\hhcentersample\libwiz\MsHelpConverted\library.HxS -d "Toyota Barcode System Help"
Then, register the namespace using hxreg, giving your help a unique name within the system. In this situation, the name specified in the -n and -i switches should be the same since you're not including this HxS into another collection. This name can be anything you'd like it to be. The -s switch is also used here to specify the HxS file to register:
"c:\program files\microsoft visual studio.net\common7\ide\hxreg" -n CompileTest -i CompileTest -s d:\hhcentersample\libwiz\MsHelpConverted\library.HxS
Finally, there are two ways you can view your completed project. You can use the DExplore viewer that was installed with the preview, passing it the unique name you passed in the -n switch to hxreg:
DExplore.exe /helpcol ms-help://CompileTest
Or, you can use my viewer and either use File | Open or the Namespace tab to select your project from those that are registered on the system.

