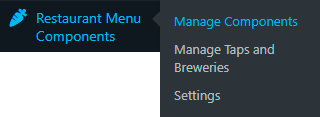
Go to Restaurant Menu Components | Manage Components:
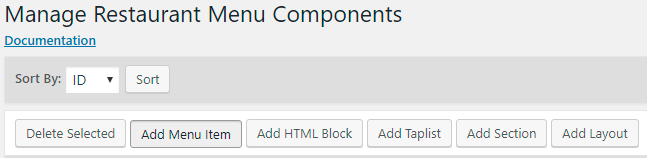
At the top of the Manage Restaurant Menu Components page, click the Add Menu Item button:
The Add Restaurant Menu Component page will open in the Menu Item format:
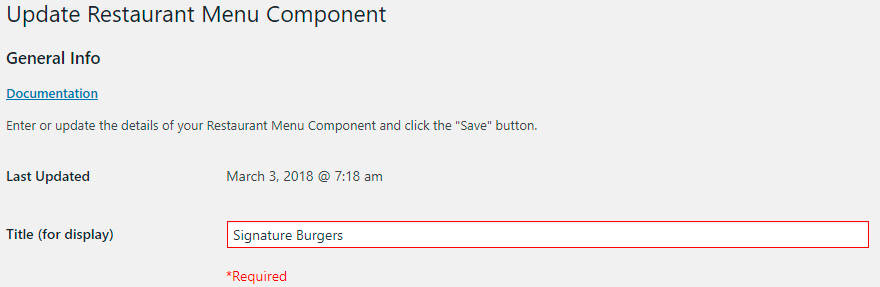
The format of both the date and time in the Last Updated field, along with the site's Timezone, are set individually in the Settings area of the site on the General page.
The Title of the menu item is the only required field. Doing so allows for the creation of tasting menus, which generally only use the Title, or the Title and a short Description.
Other fields can be filled out and other functions can be set as needed. If you only want to include the title, click the Add Menu Item/Save Changes button at the bottom of the page to save your menu item.
Description: A short “fluffy” description of the dish, generally intended to make the diner want to order it. You may use the following HTML tags in this field: <a><b><i><br><strong><em>< u><ul><ol><li> You may also include other shortcodes as boilerplate content.
86: “86” is the term used by cooks and servers to indicate a menu item is temporarily unavailable. Checking this box removes it from the displayed menu, but keeps it in-place for reinstating later.
Menu Item Theme: The theme for the complete menu can be set on the Settings page. Setting the Menu Item Theme allows for emphasis on a single menu item. Available themes are:
- (none): Default: Use if embedding an HTML Block in a Menu Item or Section
- Simple: Basic, uses the theme from the Settings page
- Brasserie:

- Chalkboard:

- Coffeehouse:

- Diner:

- Elegant:

- Farm-to-Table:

- Great Lakes:

- Pub:

- Waterpark:

Display Theme Border: In relation to the Menu Item Theme, whether or not to display that theme’s included border.
Price: While not required, this is the floating-point price only. Any currency symbol desired is set on the Settings page.
Display Multi-Size Pricing: Checking this box overrides the Price field in favor of a milt-size price listing.
Multi-Size Pricing: Use the Add Line and Remove buttons to create an array of different sizes and prices for the menu item. Use fluid measures for beverages, mass measures for meats, physical measures for crusts, “cup" and "bowl" for soups, "slice" and "whole" for pies, fluid measure per glass + "bottle" for wine, etc. A currency symbol may be set on the Settings page, but is not required.
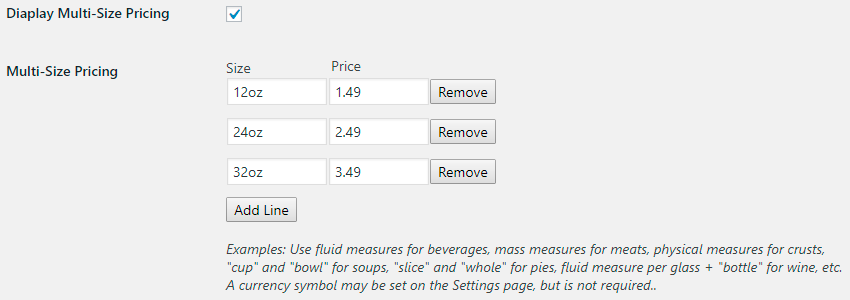
There’s no requirement for a given number of sizes, and sizes may be very descriptive as needed.
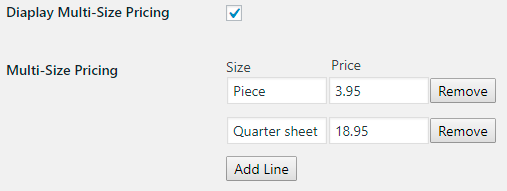
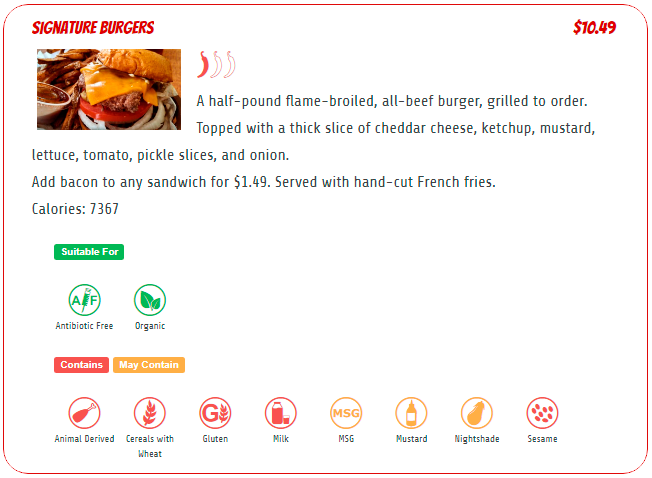
Image: Click the Add Image button to open the Media Uploader. You can then drag images to the Uploader, upload image files in the normal manner, or select a previously-uploaded image. Once you Save the menu item, the URL for the image storage location will appear in the text box, and the image will be displayed. Note that the image displayed on the Add/Update Restaurant Menu Component page is for reference only, and does not reflect the Image Width in the following field.
Image Width: Select between 25% of the overall display width, or Featured, with displays the image across the entire display width.
25% Width:
Featured Width:
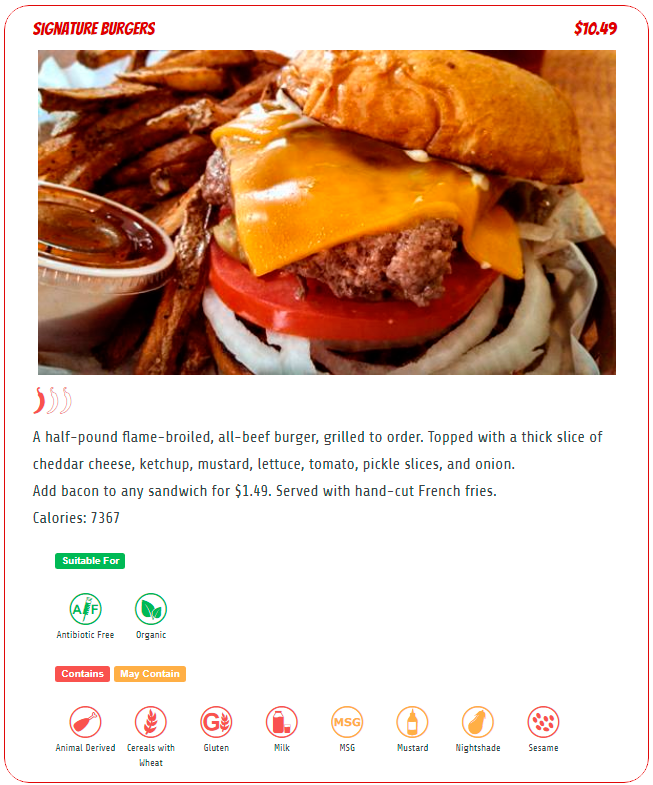
Add-Ons/Options: In the above example, this is shown as an additional charge for bacon, and that fries are included. This can be added either as text, or as a shortcode for a boilerplate HTML Block for repetitive use. You may use the following HTML tags in this field: <a><b><i><br><strong><em><u><ul><ol><li>
Calories: May be required by company rules, and/or by local or national legislations.
Spiciness: (none) is the default, along with choices for one-of-. two-of-, or three-of-three peppers. A text-only option is also available via the Settings page.
Cuisines: While these are rather self-explanatory in their usage, caution must be exercised. Certification is required to claim an item fulfills the requirements of these cuisines, that the kitchen follows the requirements for the cuisines, and for the use of some of these icons. The author of this plugin is not responsible for any usage claims and/or the certification required for the use of these icons by any entity or establishment.
Icons that are greyed-out on the Manage Restaurant Menu Components page will not be displayed. A text-only option is also available via the Settings page.
Allergens: Caution must be exercised when dealing with allergn information, so take great care in using these icons or the text-only option. The author of this plugin is not responsible for any usage claims and/or the certification required for the use of these icons by any entity or establishment.
There are three options for displying the icons: (none) disables its display, May Contain means an option is involved in the menu item (i.e. cheese or no cheese on a burger may indicate use of the May Contain option for milk), and Contains means the menu item will always contain that allergen.
Icons that are greyed-out on the Restaurant Menu Components page will not be displayed. A text-only option is also available via the Settings page.
Contains May Contain
- Animal DerivedAnimal Derived
Animal-Derived - "Meat from any kind of mammal — beef, lamb, pork, goat, and even whale and seal — can cause an allergic reaction. A bite from the Lone Star tick can cause people to develop an allergy to red meat, including beef and pork. The Lone Star tick has been implicated in initiating the red meat allergy in the US and this tick is found predominantly in the Southeast from Texas, to Iowa, into New England. A meat allergy can develop any time in life. If you are allergic to one type of meat, it is possible you also are allergic to other meats, as well as to poultry, such as chicken, turkey and duck. Also, studies have found that a very small percentage of children with milk allergy are also allergic to beef." (Source: American College of Allergy, Asthma & Immunology)
- CeleryCelery
Celery*¹ - This includes the celery stalks, leaves, seeds and the root. Usually found in celery salt, salads, some meat products, soups and stock cubes.
- Cereals with WheatCereals with Wheat
Cereals with Wheat*¹ - Wheat, rye, barley and oats are often found in foods containing flour, some baking powder, batter, breadcrumbs, cakes, couscous, meat products, pasta, pastry, sauces, soups and some fried foods.
- CornCorn
Corn – “Corn and corn-derived products are found in a wide variety of packaged foods, including Cereals, Candies, Jams, Syrups, Sauces, Snack foods, Canned fruits, Prepared meats such as hot dogs and deli meats, and Beverages. Also may include foods made with baking powder, caramel, cellulose, citric acid, dextrin, dextrose, inositol, malt, maltodextrin, monosodium glutamate (MSG), semolina, sodium erythorbate, sorbitol, starch, vanilla extract, xanthan gum and xylitol.” (Source: American College of Allergy, Asthma & Immunology)
- CrustaceansCrustaceans
Crustaceans**¹ - Crabs, lobster, prawns and scampi are crustaceans. Shrimp paste is an allergen in this category that is commonly used in Thai and South-east Asian cooking.
- EggsEggs
Eggs**¹ - Eggs are found in cakes, some meat products, mayonnaise, mousses, pasta, quiche, sauces and pastries. Some food products are glazed with eggs during cooking.
- FishFish
Fish**¹ - You may find fish sauces in pizzas, relishes, salad dressings, stock cubes and Worcestershire sauce.
- GlutenGluten
Gluten** - We include a Gluten icon because of the prevalence of the use of the term in the US. “Gluten allergy is a misleading term commonly confused with wheat allergy, or sometimes celiac disease. There is no such thing as a gluten allergy. A gluten intolerance is not an allergy, and there are currently no tests for accurate diagnosis. People with certain symptoms might need to be tested for celiac disease, but few people with gluten intolerance have celiac disease. There are many people who label themselves as ‘allergic’ to gluten, and unfortunately limit their diet without having seen a specialist.” (Source: American College of Allergy, Asthma & Immunology)
- LupinLupin
Lupin*¹ - Lupin is a flower, but it is also sometimes found in flour and is sometimes used in bread, pastries and pasta.
- MilkMilk
Milk**¹ - Milk is found in dairy products such as butter, cheese, cream, milk powders and yoghurt. Some foods are also glazed with milk during cooking. It’s also commonly found in powdered soups and sauces. Other foods, such as charcuterie, sausages, and hot dogs, include dry milk powder.
- MolluscsMolluscs
Molluscs*¹ - Includes mussels, land snails, squid and whelks, but can also be found in oyster sauce, which is commonly used in fish stews for example.
- MSGMSG
MSG – “Monosodium glutamate (MSG) is a flavor enhancer commonly added to Chinese food, canned vegetables, soups and processed meats. The Food and Drug Administration (FDA) has classified MSG as a food ingredient that's "generally recognized as safe," but its use remains controversial. For this reason, when MSG is added to food, the FDA requires that it be listed on the label.” (Source: Mayo Clinic)
- MustardMustard
Mustard*¹ - This includes Mustard in the form of powder, liquid and seeds. This ingredient is used in breads, curries, marinades, meat products, salad dressings, sauces and soups.
- NightshadeNightshade
Nightshades – “Nightshades are certain vegetables which contain saponins, alkaloids and lectins. These include the Capsicum family (bell peppers, chili peppers, jalapeno, cayenne pepper etc.), Eggplant (Aubergine), Goji berry, Ground cherry, Potatoes, Tamarillos, Tomatoes and concentrated tomato products, and Tomatillos.” (Source: The Food Intolerance Institute of Australia)
- PeanutsPeanuts
Peanuts**¹ - Peanuts are often used as an ingredient in biscuits, cakes, curries, desserts, sauces, groundnut oil and peanut flour.
- SesameSesame
Sesame*¹ - These are found commonly in bread, usually sprinkled on buns such as hamburger buns, bread sticks, houmous, sesame oil and tahini.
- SoyaSoya
Soya**¹ - Found sometimes in bean curd, edamame beans, miso pates, textured soya protein, soya flour or tofu, soya is a staple ingredient in oriental food. It can be found in desserts, ice cream, meat products, sauces and vegetarian products.
- Sulfur DioxideSulfur Dioxide
Sulfur Dioxide*¹ - This is an ingredient often used in dried fruits and in some meat products, soft drinks, vegetables, wine and beer. Asthmatics have a higher risk of developing an allergy to sulphites.
- Trans FatTrans Fat
Trans Fat – “Trans fats increase your risk for many chronic diseases, such as heart disease, stroke and type 2 diabetes. They have been banned by the FDA in the US but are still found in other parts of the world. One ingredient to look for on labels is partially hydrogenated oils. Products include Cakes, pies and cookies (especially with frosting), Biscuits, Breakfast Sandwiches, Margarine, Crackers, Microwave Popcorn, Cream-filled Candies, Doughnuts, Fried Foods, Frozen Pizza.” (Source: Cleveland Clinic)
- Tree NutsTree Nuts
Tree Nuts**¹ - Nuts (excluding Peanuts) refers to nuts that are grown on trees; unlike peanuts, which are grown underground. This includes cashew nuts, almonds and hazelnuts.
Footnotes:
- * - Declaration of these allergens is required in the UK and EU under the EU Food Information for Consumers Regulation of December 2014.
- ** - AKA "The Big Eight", declaration of these allergens is required in the UK and EU as above, and is also suggested in the US in order to align with the Food Allergen Labeling and Consumer Protection Act of 2004.
- ¹ - These icons, and their descriptions, are the Erudus icons for diet types and allergens, from Erudus: The Food Industry’s Collaborative Solution to Sharing Product Data, West Yorkshire, UK. For more complete (but non-exhaustive) product and ingredient listings, see the Erudus description page
Once you’re done filling in the fields and selecting the options for your menu item, click the Save or Update button at the bottom of the page.
Displaying a menu item: Return to the Manage Restaurant Menu Components page and locate the listing for your saved menu item:

To add a menu item to a page, Section or Layout, include the complete shortcode (including the brackets) to a site where the Restaurant Menu Components plugin is installed.
To edit a menu item: Click the link on its title.